Note: You can select any text editor of your choice. I chose this because this is easier to use than vim
This article has been written primarily for the benefit of newbies, who have advanced beyond the stage of changing wallpapers and alternating between desktops, and want to connect to another computer at home. The whole process has been described using KDE 3 on RedHat Linux 8.0, although you should be able to use similar techniques on your distribution or platform of choice.
If you are still reading this article, then you are probably at the same stage of your journey through Linux and the KDE as I was a few months ago. You already know your way around KDE, and are comfortable with its workings. I also assume that you can type a few elementary commands at the terminal window. So, let us get started.
This article deals with configuring a small network with a Linux client (workstation) and a Windows server supplying an IP address to the client. We do not go into the details of IP address assignment. However, we shall consider obtaining an address automatically from the DHCP server.
Just consider the DHCP server to be a kind of black-box which automatically assigns IP addresses to clients on the network.
Tip: A simple method for a newbie to set up a DHCP server on a Windows XP machine is to set up the computer for Internet Connection Sharing using the Home Networking Wizard.
Windows machines on your network can access shares such as directories (known as folders in Windowese) and printers on your Linux box, using the SMB (Server Message Block) protocol for UNIX/Linux systems. It is also known as the CIFS (Common Internet File System), LanManager or NetBIOS protocol. The Samba software suite is a collection of programs which implements the SMB.
So, the long and short of it is that we can set up the network for sharing files using Samba. KDE makes setting the whole thing up easy.
To perform all the tasks mentioned below, you may need to login as root.
Step 1: Click on the K Menu. Select Extras->Accessories->Text Editor
Note:
You can select any text editor of your choice. I chose this because
this is easier to use than vim
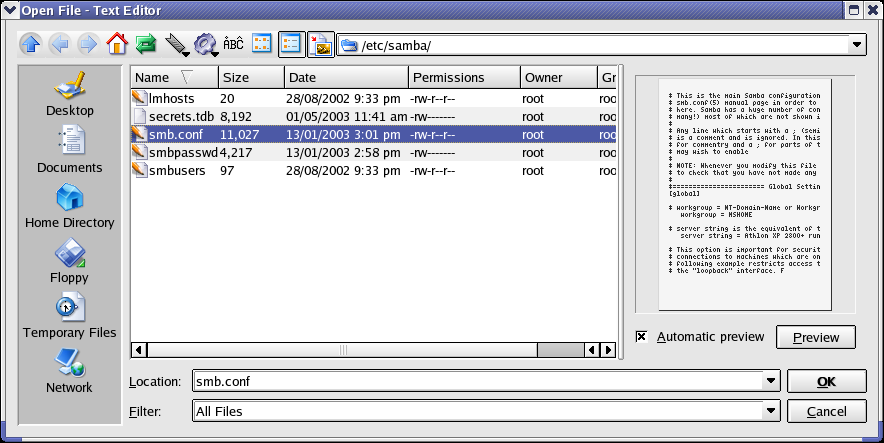
Step 2: Click on the File menu, select Open, and once the Open dialog opens up, select the file /etc/samba/smb.conf
Step 3: In
the section marked [global], the first line starting with # is a
comment. The second line has a field workgroup=my-workgroup-name.
Replace my-workgroup-name with the name of your Windows
Workgroup name, or your NT domain name. Let us assume your workgroup
is called pizza (simply because I like pizza).

Step 4: Specify
the server string, which is equivalent to the description field in
NT. You can name it anything you want. For example, my server string
goes something like this.
server string = My Linux Box
This is only a description of the computer and is not used for any processing.
Step 5: Scroll down to the section labeled share definitions. This is where we specify the directories and printers attached to our Linux box which we want to share with the other computers on the network.
Step 6: In the section labeled [homes], set browseable=yes and writable=no. If the lines you are editing are commented with a leading semicolon, remove the comment. But do not remove the comment marks for all the lines. Scroll down and you will see quite a few examples on how to share directories and printers using Samba.
To share a directory on your computer with others on the network, type in code similar to what is mentioned below:
[cdrive]
comment = C Drive on the Athlon XP 2800+
path = /mnt/c
valid users = shobha siddhu administrator root soman
public = no
writable = yes
printable = no
create mask = 0765
You can share as many folders as you desire.
Step 8: Save the file and close the text editor. Now comes the part of the installation where you have to type commands (GOLLY!!) on the console. But for those who feel queasy when thinking of the console, the people behind KDE created 'Konsole'. Click on the button on the panel which looks like a terminal, or:
Press Alt+F2, and type konsole into the run window which appears.
Step 9: Change directory to /etc/samba by typing cd /etc/samba. I'm sorry, but some things can't be avoided- you have to type this.
Step 10: You have specified valid users for your shares. But all the users need passwords. Smbpasswd is a tool which allows creation of these passwords. All the users specified must be valid users for the Linux box.
Initially, we have to create a password file. To create a password
file using the existing /etc/passwd file, at the konsole, type:
cat /etc/passwd |mksmbpasswd.sh > /etc/samba/smbpasswd
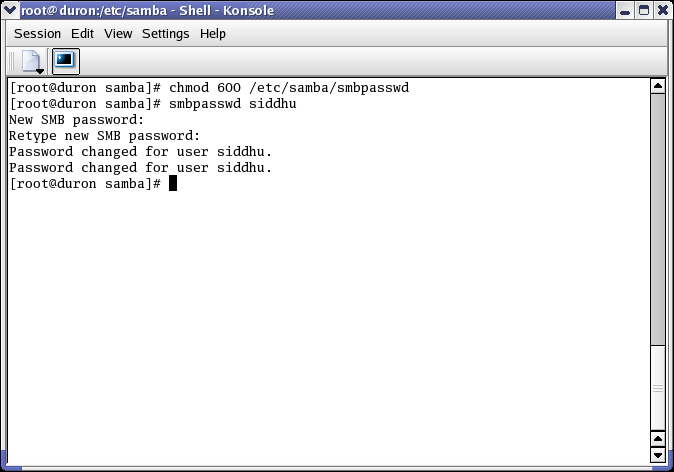
The syntax for smbpasswd is:
smbpasswd username password
For example, to add a password for a user bush, type:
smbpasswd bush wmd
Then, wmd is the password for the user bush. Note: the user bush must be specified among the valid users.
Now, we have to protect the password file from unauthorised modification.
Open Konqueror, and access the contents of the directory Samba.
Right Click on the file smbpasswd, and click on the Permissions TAB
Check the Read and the Write CheckBoxes for User, if unchecked. Uncheck all the other CheckBoxes.
Specify root as the owner of the file by typing root in both the text boxes in the Ownership frame.
For the changes to take effect, restart the smb service by typing:
service smb restart
Where the passwords are used:
When a user tries to connect to and access your Linux shares from his Windows machine using Network Neighbourhood/My Network places, he has to type his username and password, as we shall see in the next step when we test the configuration made.
Step 11: TESTING YOUR CONFIGURATION IN WINDOWS
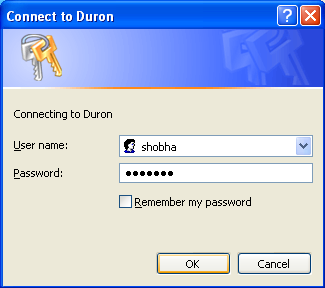
This is the most disgusting step of all. YOU ACTUALLY HAVE TO USE A WINDOWS MACHINE TO DO THIS! Steel yourself for the ordeal, and sit down in front of a Windows machine on the network. On the Desktop, double click on 'My Network Places' or 'Network Neighbourhood' as the case may be, and view the workgroup computers.
Select the Linux computer by double clicking on it. Then, a password dialog box as shown in the figure will pop up. Type in any one of the usernames and passwords specified earlier.
Step
12: Now, the last part that remains to be performed is to
view Windows shares from the Linux box. And this, with KDE, is easy
as pie!
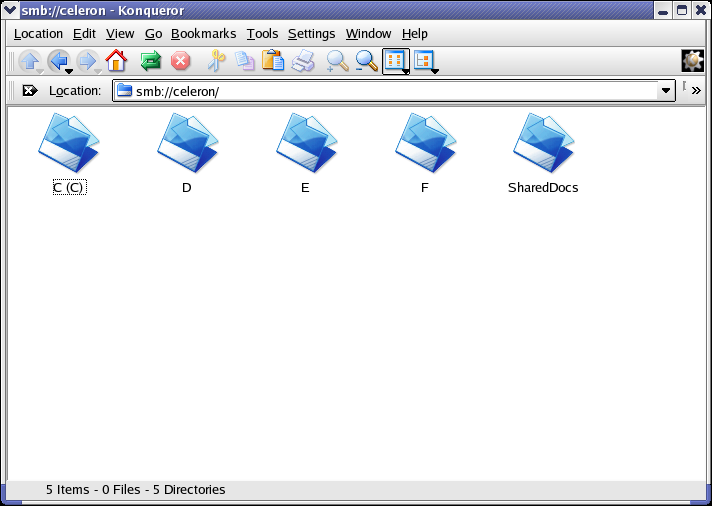
Open Konqueror, and type smb://hostname in the address bar. For eg: smb://celeron or smb://duron and you can see all the shares of that machine.
We can mount the remote file systems using the smbfs file system, and access them like local folders.
For this, we have to type the following command at 'konsole', or by bringing up the Run Command window by typing Alt+F2 and by typing the command in the window:
mount -t smbfs //hostname/sharename /[directory in the computer on which the share should be mounted]
For example: mount -t smbfs //celeron/d /mnt/Network/d
To mount the remote file systems during boot up, we have to add entries in a file known as fstab, (file system table). This can be done automatically using linuxconf. If you do not have linuxconf installed, you may have to manually edit the file using the text editor.
For this, we will have to add the following lines to /etc/fstab, after opening it using Text Editor
//hostname/sharename /[local path] smbfs noauto 0 0
Remember to add one line for each share on the network.
The noauto option is specified in order to prevent automatic mounting on network shares during bootup. This is useful because sometimes other hosts on the network may not be switched on and you may not like to see error messages on bootup.
Now is the time to rejoice, and hop about. Its all over! Samba has been set up...
Feel free to comment on or discuss this article at KDE Dot News.